Lets get straight into it then. Long story short, Flutter is a cross-platform mobile application development framework created by Google, and we program in Dart.
So the first app is a Xylophone app. The app UI has 7 buttons from top to bottom, each button having a different color and playing a different music note when tapped.

So that’s the end result, let’s see how we can get there. We’ll begin with a checklist.
- Create an outline
- Import the assets
- Enable audio playback capability
- Code
- Implement functionality
Note: This exercise is part of the Flutter Development Bootcamp course by Angela Yu in Udemy. It’s one of the best beginner Flutter courses in my opinion.
Create an Outline
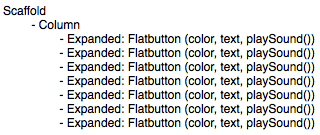
The UI of the project consist of 7 buttons laid out vertically taking up the entire space of the screen, and are equally sized with no space in between the buttons.
In order to achieve this we create a Column as child to our Scaffold. This Column will then have 7 children. Each child will be a Expanded widget with a flex of 1 (default value). The reason for using Expanded widget is that it will then allow its child to be stretched to its entirety – and by flex = 1 means each the Expanded widgets will take up the screen space in a 1:1:1:1:1:1:1:1 ratio – thus equally sized.
Each Expanded widget will have a Flatbutton as its child, which in turn will have
- unique color
- a text ‘Note x’ where x is the Note number (or index)
- onPressed method which calls a function to play the audio file
Our outline of the code at this point will look something like below
Now, note that when we actually write this code, this would become a lot more lines, and more importantly a lot more duplication of the code – which isn’t really ideal. So, what we can do is create a function to create the Expanded widgets and its children on the run, and instead call this function 7 times. Each time we call the function, we just need to pass the color of the button and the button text as parameters. The onPressed method of all the buttons will play the same function to play the audio file. The outline should look more like below now.
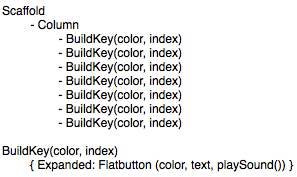
The code will look much more elegant this way, and ofcourse readable.
Import the assets
The assets we need in this project are our audio files. In order to include them in our project, you need to do the following
- Create a folder in our project and add the audio files to it (drag and drop on the editor)
- Reference the audio files. You do this in your pubspec.yaml file.

Note: I am using VSCode as the editor.
Enable audio playback ability
In order for our project to play audio, we have to add what is called a package to our flutter project. Flutter Packages are basically widgets that do certain things designed by other devs to make our life easier. In this case, we’ll look for one that can play audio. it’s pretty much straightforward, you just head over to this website and search the functionality you need.
In our project, we’ll be using the following package. All packages will come with the instructions on how to include it to your project. Just follow them step by step.

Alright, so the prerequisites can be marked as complete. Let’s write it!
Code
Let’s jump straight into it. The code will begin with our main function which is what get executed first on our project

The main function in turn calls our Class XylophoneApp which is where all our code lies.
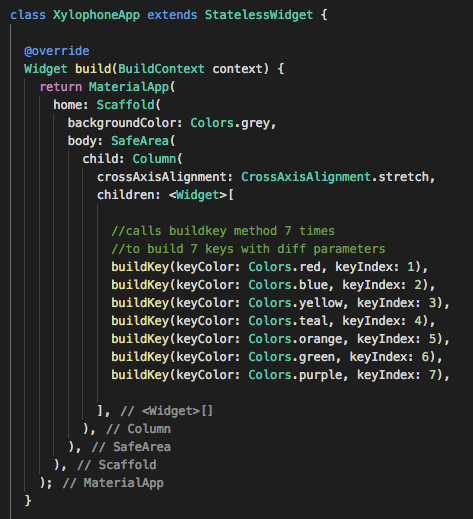
As you can see, the Xylophone class follows the same structure mentioned in our outline. Few things to note here
- we have used a stateless widget since our app at no point during its run changes its state, or updates anything in the UI.
- body of the Scaffold uses a SafeArea before calling the Column. This is to make sure our app screen space doesn’t get cut off by any hardware elements.
- Column has its CrossAxisAlignment property set to stretch. Without this the button would stack up on the left side of the app (as default)
- buildKey method takes two parameters – keyColor and keyIndex, and we’re using named parameters here. This keyindex will be used later to play the audio file and write the button text.
Now let’s look at the buildKey method.
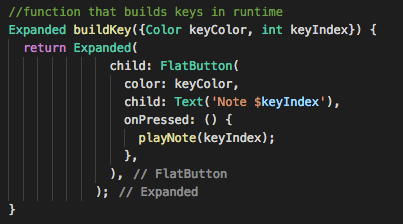
Key points to note
- This method returns an Expanded method each time it’s called.
- keyColor is used by the FlatButton to assign a color to itself
- keyIndex is used by the Text of FlatButton to give itself a text.
- onPressed for each FlatButton calls a method playNote and passes the keyIndex as its parameter – which means for each button, there’s a corresponding audio file to be played – all depending on the value of keyIndex.
Implement functionality
Now, the last part of the app – the important one in terms of user experience, which is to play the audio file. For us, it’s writing the playNote() method.

The code for playing the audio file can actually be found from the Package instructions page. It’s pretty much the two lines in the screenshot. We use the keyIndex passed from each FlatButton to call specific audio files by using that in our player.play() function.
That’s pretty much it.
to be update: add code to git, and post link here
